 Loading... Please wait...
Categories
Our Newsletter
- Home
- Tips from Customers
Tips from Customers
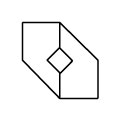
I wanted this:
To fit in this:

with a hole down the full length.
So the question was how to do it. But what I am about to explain can be used for making a hole down a long length of timber too for applications like wooden hydraulics on models. This process at least gives you a square section hole down the middle but if you run a long drill down the hole it will round out the shoulders for you as well. Just make sure the length of the diagonal of the hole are equal to the size of the drill you want to put down the hole or this can then be put over a long pen mandrel and turned round on a lathe.
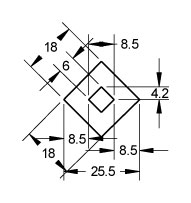
It is important to draw the end section first as in figure 1 as that helps you set up your table saw for cutting. My saw is a Proxxon Table saw and for fine work like this it is perfect but can be done on larger table saws too.
Figure 2 was marked out, cut out and glued together the same way. I made Figure 2 first the made the piece in figure 1 fit it.
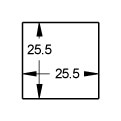
Firstly you will need a piece of square timber equal to the diagonal measurement of your finished piece which is 25.5mm.
Now set your saw to 45 deg. and then lower the blade to 4.2mm high as in the drawing. Now set your sawing guide 8.5mm away from the point where the blade and the table surface intersect. This has now set up your saw for cutting.
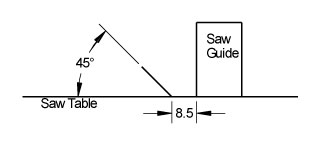
You now cut your timber this way:
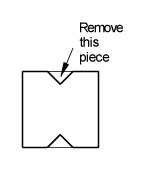
Now rip the job piece into two pieces like this:
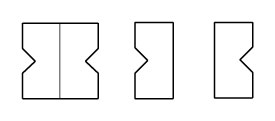
Mark it out like this and cut it to equal this.
The next part of the process is to turn the grooves to face each and glue back together. If you just want a hole the length of the timber you can stop now. (At this point it can be put onto your lathe and turned to the diameter you want.)
You now have an end section that looks like this:
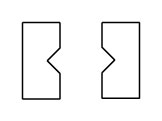
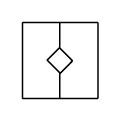
Now raise the blade up to full height and leave at 45 deg.
From the square section there are further cuts to be made starting with this one:
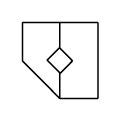
Next turn your job over and make this cut:
The next step is to set your saw back to 90 deg. Set your saw guide to 27mm from the saw blade and make the next cut.
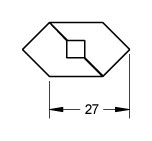
That cut will now make your job look like this:

The next step is to make the last cut. It means setting your saw guide to 18mm from the saw blade and making the cut. Your job should now look like this:
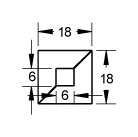
Congratulations you have done it!!!
Customer Tip 2
Tip1.
Here is a solution to a problem I had. I wanted to hold a piece of 2mm rod in my lathe chuck so I could cut a thread on it and it would barely hold 3mm rod.
Between Rob at MTS and myself we worked this out.
Take a piece of say 6mm rod and drill a 2mm hole through the centre. I used brass. Then using a hacksaw cut a slot down the length of the rod but not wider then the 2mm hole. This slot gives you enough movement in the metal for the chuck to clamp the rod. See figure one.
Tip 2.
Now to take this further. I also need to drill a hole in the end of a piece of 4mm square rod- a bit hard in a three jaw chuck.
Make up this jig on the same principle as above but drill a hole in a piece of any size stock (I use brass) equal to the diagonal measurement on the square rod. Now turn down the outside of the stock to a size close to the size of the hole to say within 1.5mm (this measurement is not critical). The closer the tolerance the more give in the jig to assist clamping but don’t go too close or your jig will distort. Now you are ready to drill.
Tip 3.
With the knowledge of my mate Derrick he taught me how to use my lathe to thread rod squarely.
Firstly set the rod in your lathe. Now set up your die in its handle. Place it on the end of the rod and move the tailstock with the drill chuck in it up against the back of the die. Open the jaws of the drill chuck as large as possible to fit inside the handle opening but make sure it keeps contact with the die and lock it in place. Because the ends of the chuck jaws are machined square it will hold the die square to the rod. The handle of the tool will contact either the lathe bed or the cross slide and will make a third hand unnecessary. DON’T TURN ON THE LATHE AT ALL IN THIS PROCEDURE. If you do you will be severely surprised in can assure you.
Now turn the lathe chuck by hand and at the same time turn the tailstock feed to hold the die firm. Continue threading as per manual threading rules.
With practice you will feel the load come off the lathe chuck and now its time to add load again via the tailstock.
This takes so much angst out of threading. I haven’t had a dud thread since a started using this method.
Figure 1.
